Recap Kits · 68 Custom Vibrolux Reissue Recap Kit
Fender 68 Custom Vibrolux Reverb Recap Kit
Optional Tools/Supplies:
- Silicone glue.
- 9/16” nut driver or socket wrench.
- 1/2” nut driver or socket wrench.
- Fine point Sharpie or similar permanent marker.
- Masking Tape
Skills required:
- Basic soldering skills .
- Basic knowledge of electronics.
- The Ability to follow instructions.
Note: Voltage values on capacitors may vary slightly due to stock from our distributors.
Parts
- 47/500 EL CAP Axial
- 22/500 EL CAP Axial × 3
- 22/25 EL CAP Axial × 5
- 4.7uf/50 EL CAP Axial
- 47/16 El Cap Radial
- 22/63 EL CAP Radial × 2
- 100/100 EL CAP Radial
- 5W Resistor To safely drain the existing filter capacitors
Tools
- Temperature Controlled Soldering Iron and Solder
- Solder Sucker and or de-soldering braid
- Multi-Meter Capable of reading 500V DC
- Phillips Screwdriver
- Pliers with insulated handle
- Wire Cutters
- Safety Goggles
- Alligator Leads
1
Step 1
- WARNING: Performing these modifications WILL void the warranty on your amplifier. Working on amps can be deadly if you do not take proper precautions. Follow these instructions very carefully. If you are at all unsure of your ability to perform these modifications STOP and take your amp to a professional to be modified. You can also send your amp to me for modification.
- No Warranty: This kit and the instructions included do not include any warranty of any kind. The modifications to your amplifier are at your own risk and you agree to completely hold harmless the seller of this kit against any and all claims. Tube amplifiers contain parts that operate at very high temperatures and deadly voltages. If you are not sure of your abilities to perform these modifications then do not perform them.
- CAUTION: TUBE AMPLIFIERS CAN CONTAIN DEADLY VOLTAGES EVEN WHEN THEY ARE NOT PLUGGED IN—BE SURE TO DRAIN THE FILTER CAPS BEFORE WORKING ON THE AMP—NOT DRAINING THE FILTER CAPS COULD RESULT IN SERIOUS INJURY OR DEATH.
2
Prep the Amp
- Instructions: Follow these instructions to the letter.
- It’s a good idea to have all the parts and tools you will need laid out before starting in a well lit area.
- Unplug the Amp and put on your safety goggles.
3
Step 3
- Remove the tubes, unplug the speaker, unplug the reverb from the chassis (be sure to note which side is red and which side is white, remove the clips holding the power cable to the cabinet.
4
Step 4
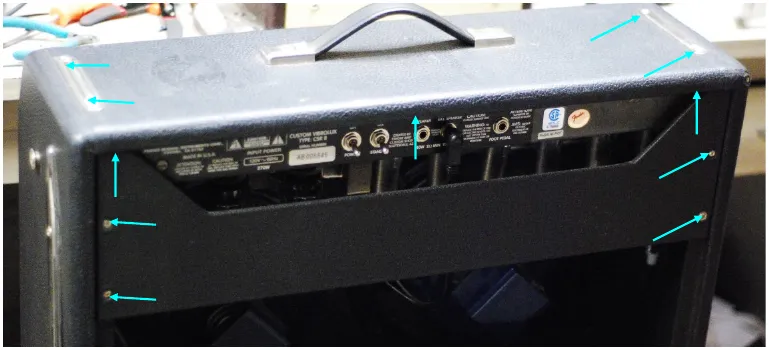
- Remove the screws holding on the back panel and remove the panel. Then remove the chassis screws.
5
Step 5
- The chassis should slide out easily exposing the circuit board I find it easiest to work on the amp with the chassis completely removed from the cabinet.
6
Step 6
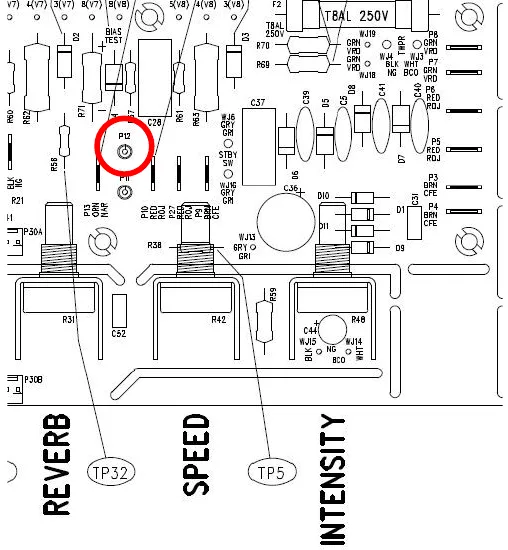
- WARNING: SKIPPING THIS NEXT STEP COULD RESULT IN DEATH
- Drain the Filter Caps: Using your multimeter set to DC measure the voltage at P1 to ground. If the voltage is more than 15 VDC you need to drain the caps. It’s good practice to keep your left hand in your pocket and work only using your right hand. Then if you do touch something that is high voltage while grounded the current will hopefully go though your right hand to ground and miss your heart. Clip an alligator lead to P1 and to the 5W power resistor, clip another alligator lead from the other side of the resistor to ground. Measure the voltage every minute until the reading is less than 15 VDV. Repeat this process if necessary.
7
Step 7
- Remove the control knobs by loosening the set screws and all the nuts securing the pots and jacks to the chassis.
8
Step 8
- Clip the zip tie holding the leads from the bias pot to the main PCB
9
Step 9
- Unplug the connectors from the control PCB to the main PCB.
10
Step 10
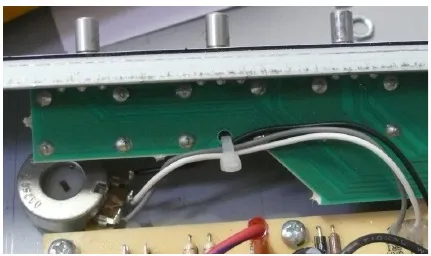
- The entire control PCB can now be removed from the chassis.
11
Step 11
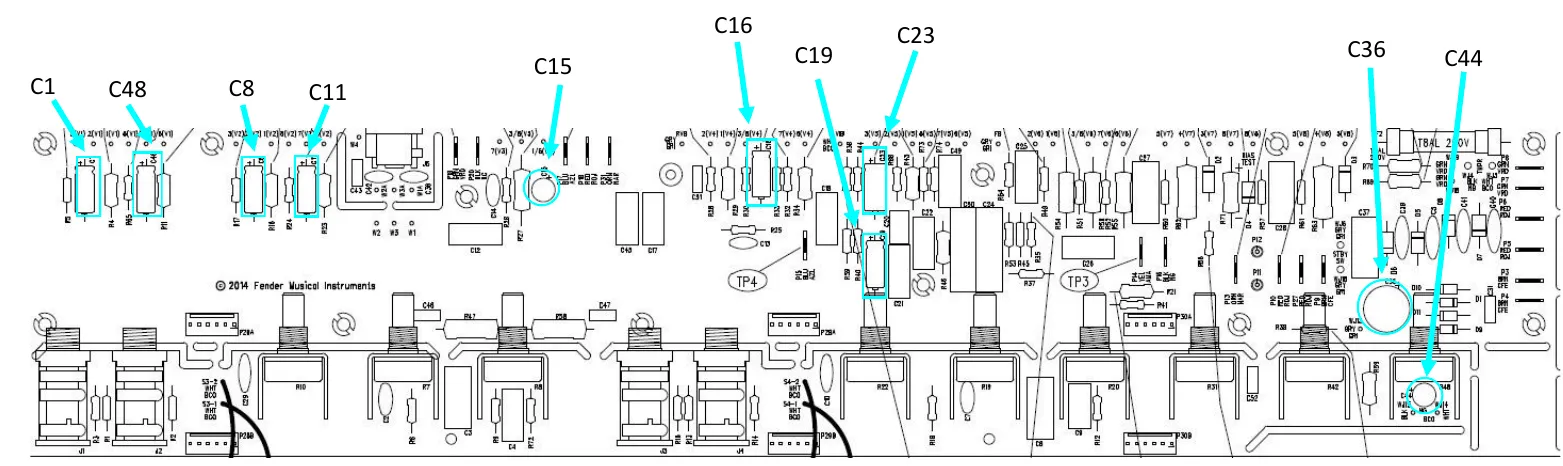
- Replace all the electrolytic caps as indicated below.
- Position Value Type
- C1 22/25 Axial
- C48 22/25 Axial
- C6 22/25 Axial
- C11 22/25 Axial
- C15 22/63 Radial
- C16 22/25 Axial
- C23 47/16 Axial
- C19 4.7/50 Axial
- C36 100/100 Radial
- C44 22/63 Radial
- C1
- C48
- C8
- C11
- C15
- C16
- C19
- C23
- C36
- C44
12
Step 12
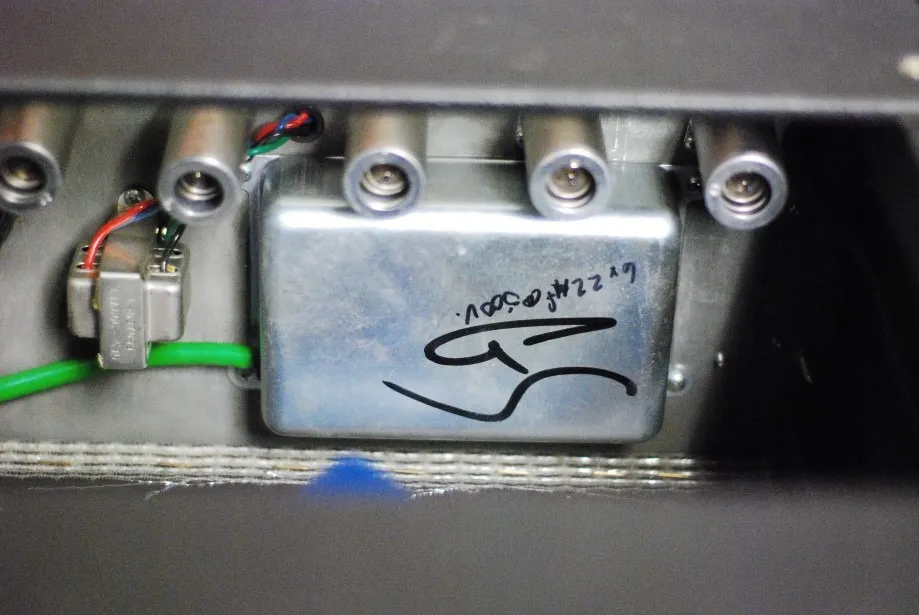
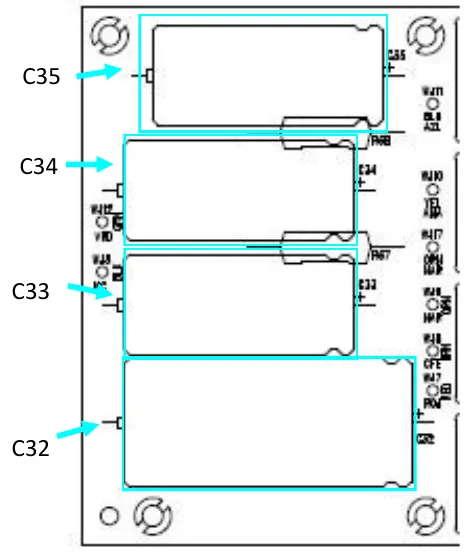
- Put the screws back in the Main PCB and flip the amp over. There is a cover over the power filter capacitors where the rest of the caps in the kit will go.
- C35
- C34
- C33
- C32
- Position Value
- C35 22/500
- C34 22/500
- C33 22/500
- C32 47/500
13
Putting the Amp Back Together
- Use Silicon to secure the caps to the PCB. Make sure that you have clipped all the excess leads from the solder side of the board and that all your new solder joints are secure before continuing.
14
Step 14
- Carefully put the PCB back into place making sure that none of the leads to the other boards or tube sockets have been disconnected.
15
Step 15
- Replace all of the PCB mounting screws.
16
Step 16
- Dress the Transformer leads!!! Poor lead dress is a large part of the noise in an amp. Instead of using a new cable tie to put the wires back like we found them we are going to use standard wiring techniques for proper tube amp design. Twist the green heater wires and position as shown. All other lead pairs should be twisted and cross each other at 90 degree angles to avoid noise, hum, and oscillation.
17
Step 17
- DOUBLE CHECK ALL YOUR WORK.
18
Step 18
- Re-install the chassis the same way you took it apart, install the three small screws holding the chassis to the top of the amp (I like to turn the amp upside down when I do this), plug in the reverb and clips holding the power cord and reverb cable. Plug in the speaker cable. Install the back panel, then the 4 main chassis screws on the top of the amp. Replace the tubes and you should be ready to rock.
19
Troubleshooting.
- The PCB is fragile and even when great care is taken to remove components gently it is still possible to lift a trace off the PCB. The fix is to cut the pad off the board then using an Exacto knife carefully scrape away some of the green solder mask on the trace next to the pad. Bend the lead over the bare copper and solder to that. Clip the lead and use silicon on the top side of the board to secure the component in place.